How to Make a Tarp Shelter Without Trees

Hey there, fellow outdoor lovers! Are you ready to enter the exciting world of tarp shelter building? Whether you’re a seasoned camper or an aspiring survivalist, mastering the art of making a tarp shelter without trees is bound to come in handy during your adventures.
At first glance, it may seem daunting to build a stable structure with just tarps and no trees as pillars. But fear not – we’ve got some great news for you! In this comprehensive guide, we’ll show you different techniques and designs that will enable you to set up your home away from home practically anywhere.
Our guide covers everything from diamond frame tarps to A-frame setups and Holden shelters - providing all-round solutions for various environments. So regardless of what type of adventure awaits you, we’ve got you covered!
The following sections are packed with valuable insights and step-by-step instructions on how to create these astonishingly efficient shelters without breaking a sweat. So why wait any longer? Let’s get started already!
Different Ways to Make a Tarp Shelter Without Trees
When I go camping or hiking, staying dry is a top priority. One of the best ways to ensure this is by setting up a tarp shelter. However, sometimes it can be tough to find suitable trees to attach the tarp to. But fear not! There are other options for creating a sturdy and reliable tarp shelter without trees.
First up is the diamond frame tarp shelter which involves tying each corner of the tarp to stakes in an “X” shape. This creates a stable structure that holds up well even in blustery conditions while providing plenty of ventilation.
Another popular choice is the A-frame tarp shelter, which only requires two trekking poles or tall stakes that you can prop up at an angle against each other. You simply drape your tarp over the top and tie it down on either side with guy lines and more stakes.
If you’re looking for something more elaborate that provides even greater protection from both rain and wind, check out Holden Tarp Shelter. It involves running guy line cords under rocks instead of staking them into the ground (which works well if you happen to be camping on rocky terrain).
With these different options under your belt, you can feel confident heading out into nature knowing that inclement weather won’t sabotage your adventure!
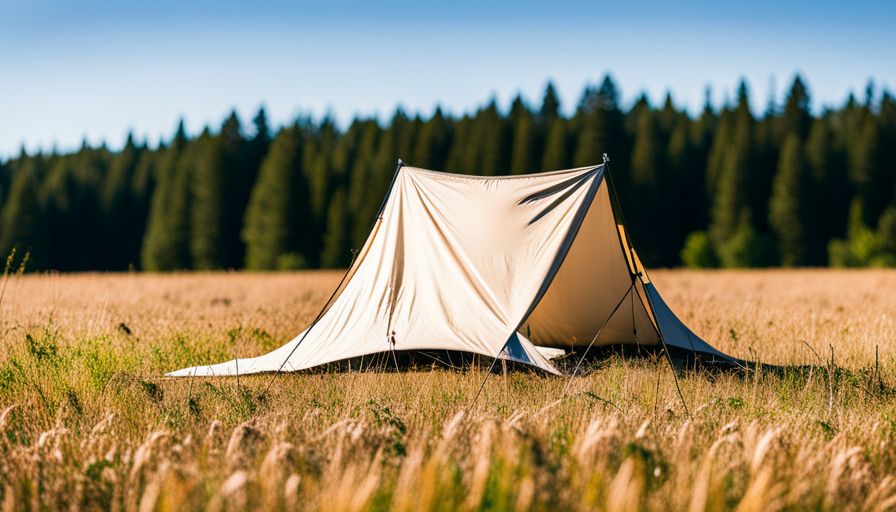
Diamond Frame Tarp Shelter
https://www.youtube.com/watch?v=ZV92xni5q8w
To create a Diamond Frame Tarp Shelter, start by finding a large, flat area where you can pitch your tarp. Next, cut a piece of paracord to approximately 10 feet in length and tie it between two trees or posts, making sure the line is taut. Then drape your tarp over the cord and secure it with stakes on each corner.
To create the diamond shape of the shelter, take another piece of paracord and tie one end to a stake at the bottom of one side of your tarp. Secure the other end of this cord to a stake at the top center point of your tarp. Repeat this process for all four corners.
Finally, adjust and tighten all lines until you have created enough headroom in your shelter while still providing adequate protection from weather conditions. Overall, this design provides great stability against wind gusts and ample space for up to two people with gear.
Pro Tip: If you do not have trekking poles available when setting up your diamond frame tarp shelter, you can use sticks found nearby as an alternative solution!
A-Frame Tarp Shelter
https://www.youtube.com/watch?v=0ellIyxim0U
Creating an A-frame tarp shelter is a cinch with only two poles and a tarp. First things first, scouting for just the right flat location is key. Avoid sharp rocks or sticks to keep your surroundings as cozy as can be.
Begin by tying one end of the tarp to a sturdy tree or post at your perfect height. Next, lay the other end of the tarp on the ground precisely where you want your doorway to lead out and in.
To finish things off, grab one pole and insert it into the corner grommet of your tarp. With it held upright in position, walk towards the opposite corner while elevating it into an A-shape. Keep doing this back-and-forth until both poles are securely propped up and placed correctly.
Using guy lines and stakes make sure you get them fixed tightly into place without overlooking proper tension for possible wind or heavy rainstorms that may come later on.
While using A-frame style shelters, ventilation flows effortlessly due to open space between both sides of your tarp making it ideal for lighter rains but not suitable during prolonged downpours compared to diamond frame or Holden shelters with more intense angles that offer stronger coverage against harsh weather conditions.
In conclusion, constructing an A-frame design will do wonders as long as staking techniques are implemented effectively even when no trees surround you!
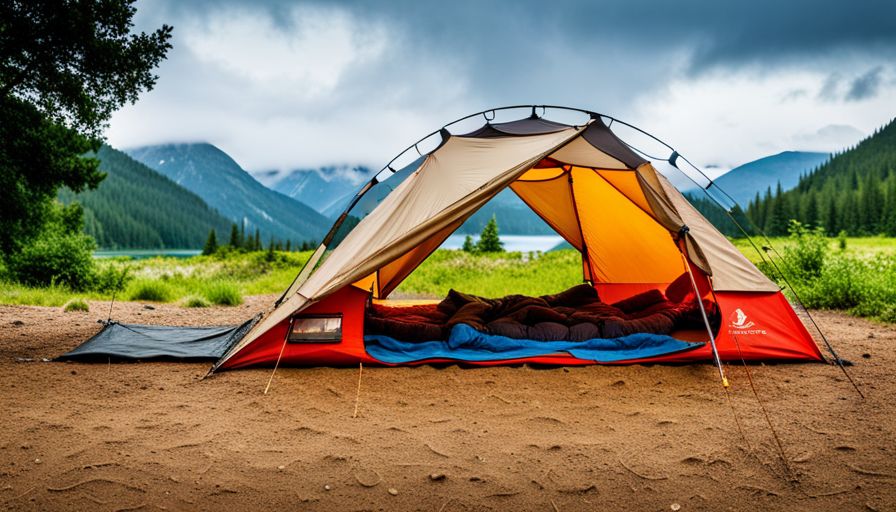
Holden Tarp Shelter
Have you ever found yourself in the middle of a camping trip without any sturdy trees around for your tarp shelter? Fear not, for I have found the solution - the reliable and easy-to-build Holden Tarp Shelter.
With minimal equipment needed, all you’ll require is a tarp, eight tent stakes, two trekking poles (or long sticks), guylines (optional) and bungee cords (also optional).
Firstly, lay the tarp flat on the ground with each corner facing north, south, east and west. Then drive one stake into each corner of the tarp before propping up a pole or stick between opposite corners to create a diagonal frame that provides ample headroom. If high winds are expected at your campsite, securely fasten bungee cords or guy-lines to both sides of the poles.
Finally adjust guy-lines as necessary to tension out all sides then sit back and enjoy your handmade Holden Tarp Shelter! The beauty of this design is not only its ease but also its low weight due to its unique frame construction.
But don’t forget “Prior Planning Prevents Poor Performance” - always check weather forecasts before heading on an outdoor trip so you can pack specific gear tailored for building your own optimal still sustainably-built home away from home!
So whether you’re an experienced camper or just starting out on your first trip into nature’s wilderness - take a chance on this simple yet effective solution that will keep you dry no matter what nature throws at you!
Things You Will Need to Build a Tarp Shelter Without Trees
When it comes to constructing a tarp shelter without the support of trees, there are a few indispensable tools I always keep on hand. These items not only simplify the process, but also ensure your safety and comfort throughout.
Firstly, selecting the right tarp is crucial. Opt for durable materials that can withstand harsh weather conditions like severe winds, rain or snow.
Next, you’ll require something to securely tie down your tarp. A trusty piece of paracord/rope proves handy when anchoring the corners of your tarp shelter.
In addition to paracord/rope, stakes prove necessary in keeping your tarp steady against uneven ground surfaces. Remember to pack enough stakes as per the size of your shelter structure.
Lastly, if ropes are unavailable at any given time or simply unmanageable in certain circumstances, grommets/clips can serve as an alternative method for attaching your tarp.
Armed with these essential tools ready to go, building a strong and reliable tarp shelter without trees becomes much simpler!
How to Assemble Your Tarp Shelter Without Trees
Planning and executing a tarp shelter setup without trees takes some careful consideration. There are two methods to do so: using trekking poles or not.
Using Trekking Poles
First, place one end of the pole on where you plan to put up the tarp wall. Then, attach one corner of the tarp tightly with a guyline onto the top of the pole. Repeat this for each remaining corner, ensuring there’s no slack in material. Lastly, adjust guyline tension as needed until all corners are secure.
Without Trekking Poles
Start by tying one corner of the tarp onto a stake driven into the ground at your desired spot. Next, move diagonally about 12-18 feet (depending on how much space you need) from where you secured your first corner. Then stake out this opposite diagonal corner with another stake into the ground and adjust any tension on this side too. Afterward, repeat this process with two other opposing corners till they’re anchored down securely. Lastly, make sure to tighten or loosen any slack before completing interior parts such as sleeping area.
It’s critical to stay cautious when assembling a tarp shelter without trees under stormy conditions or high winds. Prioritize checking weather forecasts before heading outdoors because adverse wind situations can be hazardous if not managed properly while camping and tenting!
Using Trekking Poles
https://www.youtube.com/watch?v=wJGzZOOe5B0
When I’m out camping in the wild, one of my favorite go-to setups for a shelter is using trekking poles to assemble a tarp shelter. The best thing about this method is that it’s super easy and doesn’t require much equipment. Plus, you can set up camp almost anywhere you want! Here are the steps I follow:
First off, place your trusty trekking poles where you wish to have the back corners of your shelter situated. Once they’re stable and planted firmly into the ground, lay your tarp cover flat on the floor with one end draped over one of these poles. Moving onto step three, hoist up and drape the opposite end of your tarp cover snugly over the other pole.
Now it’s time to secure each corner of your tarp tightly with proper stakes - remember maximum tension will hold better. Finally, repeat these exact same steps on all four corners using guyline.
It’s incredibly important that when utilizing trekking poles as part of a makeshift outdoor set-up to make any necessary weather adjustments accordingly; especially when high winds or heavy rainfall may occur. You definitely wouldn’t want them collapsing or being blown away during inclement conditions!
While setting up an ample tarp shelter using trekking poles might seem like a piece of cake at first glance; There are still some potential problems worth thinking through beforehand…
- If relying solely on trekking poles as shelter setup then re-adjusting them constantly might become cumbersome, 2) Always having alternative backup plans ready & preparing stocked items in case crucial components break, 3) Also keep in mind that building dynamic shelters from scratch may require more additional instruction than just following these five straightforward steps.
If done correctly though and taking those considerations into account - assembling an efficient outdoor temporary shelter has never been simpler!
Without Trekking Poles
https://www.youtube.com/watch?v=FHON0q85bgQ
If you’re without trekking poles for your camping trip or simply forgot them at home, don’t fret! There are plenty of ways to build a shelter with just the resources around you. Long and sturdy sticks or branches found near your campsite can be substituted in place of trekking poles. These sticks need to be about 6 feet long, so they comfortably fit into both corners of your tarp shelter.
Here’s how I like to create my tarp shelter without trekking poles:
- Grab your tarp and lay it on the ground where you want your shelter to be.
- Take one stick and place it in each corner of the tarp.
- Start by lifting one side, holding onto the center grommet until it stretches over the first stick.
- Repeat step three until all four corners are securely raised.
- Use guy lines through every corner’s grommets or tieouts - extending outward - to keep your structure stable during windy weather.
It’s essential that you choose high-quality sticks instead of trekking poles, ensuring they’re thick enough to handle rainwater weight or intense winds and won’t snap under pressure. Don’t forget, when trying this setup make sure you pick out good quality stakes; otherwise, they could break down because of harsh outdoor elements.
By building this method, anyone can quickly set up a robust and trustworthy tarp tent while enjoying different camping destinations!
Putting It All Together
So, you’ve found the perfect location and gathered all of your necessary equipment for setting up your tarp shelter. Now, it’s time to assemble everything together! Here is a step-by-step guide on how to assemble your tarp shelter without using trees.
To get started, lay out your tarp on the ground with enough space around you to work comfortably. Once it’s laid out, take one corner and use an angled stake placed at a 45-degree angle to securely pin it down.
Afterward, grab two trekking poles if you have them and adjust them to fit into the opposite corners from where you first staked down. This will add more support to your shelter once assembled correctly. Once secured in place, pull taut in the direction that requires more coverage until it feels snug against the ground and fasten both sides using angled stakes inserted through either end grommet hole or cord loop (if provided).
Now that each corner is properly secured, carefully adjust all tension lines as needed for extra stability. If there are any gaps or holes in the seams caused by strong winds or heavy rainfalls, consider sealing them up with a waterproof sealant tape like gear aid tenacious repair tape ($9). This will help preserve dryness inside during wet weather conditions outside.
Before settling in for the night under your newly created tarp shelter - check every area for alignment and stability issues just in case anything needs adjusting further before sleeping soundly beneath its protection.
All of these steps when appropriately followed will provide security against most weather conditions so that you can rest easy knowing that nature is yours to enjoy - no matter what elements come your way!
FAQ Section
If you’re planning on a camping trip, it’s always wise to prepare yourself with the right information to ensure comfort and safety. Here are some common queries often raised about making tarp shelters without trees:
What is the Best Way to Secure a Tarp?
To secure your tarp effectively, you will need sturdy tent stakes, guylines or cordage as well as rocks. The first step is securing each corner of your tarp with durable stakes. Once that is accomplished, attach guylines diagonally towards the ground from each corner and stake them tightly.
How Resilient is a Tarp in High Winds?
The strength of your shelter’s wind resistance depends on tying down techniques and terrain type for your camping grounds. In mild winds, most tarps can hold up well enough but not so much with heavy weather conditions like hurricane-level gusts.
Which Tarp Material Works Best for Tents?
Ultra-lightweight tarps that provide great waterproofing and shading abilities while still being reasonably priced are preferable. A 6x8 foot polyethylene plastic or canvas ultralight trap typically works great in most scenarios where camping shelters are concerned.
Does Stake Count Matter While Making Tarp Shelters?
While four stakes at minimum - one for each corner - are crucial to keep your tarp shelter steady, having extra backups may prove useful during sudden weather changes. It grants you peace of mind and safeguards any unforeseeable situations caused by heavy rains or rough winds.
Now that you have all these facts under your belt, why wait? Buy yourself an ultra-lightweight tarp today!
How Do You Secure a Tarp?
https://www.youtube.com/watch?v=1CeFJHpNbrA
When building a tarp shelter without trees, ensuring that your tarp is securely fastened is crucial. One way to do this is by using stakes and guylines. Start by driving stakes into the ground at each corner of the tarp and any additional points along its sides where it may sag or pull. Then, attach a guyline or cord at each stake and tie it tightly around the tarp’s grommet or loop.
For added stability in windy conditions, consider using rocks to anchor your stakes instead of simply relying on their grip in the soil. You can also use sandbags as an alternative anchoring method. Another option is wrapping paracord around a large rock and tying it to your line.
Finally, be sure to tension your guy lines effectively by pulling them tautly enough so that there is no slack between the stakes and tarps, but not too tight so as to damage either one.
By following these steps for securing your tarp shelter adequately from all kinds of environmental factors like wind and rain while you remain cozy inside will guarantee an exceptional camping experience!
How Much Wind Can a Tarp Withstand?
As someone who loves hiking and camping, I know that a tarp shelter is an essential part of any outdoor trip. It not only offers you protection from the elements but also gives you privacy when changing or sleeping. However, it’s important to know how much wind your tarp shelter can withstand.
The strength of your tarp will depend on many factors, such as its quality and how well it’s secured. High-quality and heavy-duty tarps are more likely to resist strong winds up to 50 mph or higher without getting damaged. Nonetheless, setting up and anchoring your tarp properly makes all the difference in sustaining harsh wind conditions.
Remember always to anchor down the corners of your shelter with stakes while tightening synthetic guy ropes along its edges. This prevents super-fast gusts from lifting your tarp up into the air or causing it damage. Additionally, positioning your makeshift abode near rock formations or tree stumps provides additional support for added security - one could never be too safe!
Another thing to keep in mind is that different types of tarps may have varying levels of water resistance that impact their effectivity against windy conditions indirectly. Moisture increases weight leading them vulnerable during high-speed gusts due to added inertia carrying them away.
Therefore, check weather forecasts before heading out; pack extra anchors just in case they break; select campsites wisely accommodating natural windbreaks like foliage wallowing over rocks; lastly stay vigilant throughout inclement circumstances - even sturdy materials could detach once battered by debris carried about raised windspeeds!
How Many Stakes Should I Bring to Make a Tarp Shelter?

When building a tarp shelter without trees, the number of stakes you need depends on the type of shelter you are creating and the terrain you are in. As a general rule, four stakes will be enough for most basic shelters. However, larger shelters may require more.
For a diamond frame tarp shelter, four stakes should suffice. Two at each end to secure the corners and prevent sagging.
If you’re constructing an A-frame tarp shelter, six stakes may be required: two at each end to pull out the sides and another two in the middle to keep it stable.
The Holden tarp shelter is one that’s slightly fancier than others but tends to require quite a few extra yards of cordage and between 6-8 additional stakes depending on wind conditions.
Always ensure that your stakes are strong enough to withstand heavy winds if they’re expected. Metal or wooden ones would remain stable in most cases compared to plastic alternatives which get destroyed after being driven several times into hard rocky ground.
In addition to these essentials, carrying some extra paracord never hurts - so pack some just in case!